Coastal Edge Miss ECSC Swimsuit Pageant

Another busy weekend of shooting wrapped up with the Coastal Edge Miss ECSC Swimsuit Pageant finals. Its been a while since I photographed a swimsuit pageant and wasn't sure how close I would be able to get to the stage so I decided to break out the D500 and the 200-400 f4.

This proved to be a pretty good choice because when I showed up I found the stage and runway was set up on the beach and was about 4 feet off the ground. I also found that half the runway was inaccessible due to the VIP/ Judges area. Now I had gotten there early enough that I could have gotten a spot right up front next to the runway but with the stage being so high I would have ended shooting up at the contestants ending up with shots that weren't too flattering.

I opted to shoot from the back of the VIP area shooting over the tops of their heads. What backing up did for me was gave a much more flattering vantage point (not looking up at the contestants) plus I didn't have to worry about people running into me or fighting me to get to the front. Using the 200-400 gave me plenty of room to get full length shots and tighter 3/4 length shots. 

While I didn't have a problem with shooting position I did have problems with the sun. Because this was outdoors at 4pm the sun was still high and cast huge shadows on the contestants when they turned and tended to blowout the skin tones.

Overall I was happy with the photos and it was pretty fun to shoot. Here are some of the photos I got.

Sports Photography: Basic Equipment

Sports Photography: Basic Equipment

Fall sports are getting underway and like every year there are a lot of people that want to start taking sports photos. This is fantastic but there are a few things you need to know about sports photography. Before I get into that I want to say 99% of the time in photography the equipment that you use doesn't matter. Its the equipment behind the camera (ie the photographer) that matters.

Now with that said, the other 1% is the small percentage of photography where the equipment does matter (to an extent). One of those areas is sports photography. Don't get me wrong, can you get awesome sports photos with less capable cameras and lenses? Well obviously the answer is yes, however, it makes it much easier and consistent if you use gear that is better suited for sports photography.

Im not going to really get into what camera body you should use. Personally for me I use a D3, D500 and D300 when I shoot sports. Here are some of the things you should consider when buying a camera for sports.

CAMERAS

The first thing is the autofocus system. You need a camera that has both a good autofocus system as well as can perform continuous autofocus very well. If you have a camera that doesn't have a good autofocus system it will cause you to loose shots due to them being out of focus or just completely missed shots.

The second thing is your continuous shutter speed or frames per second. You should look for a camera that has a higher FPS rate. I typically stick around 6fps or higher for sports. What this allows you to do if you shoot a quick burst you will get more frames and a better chance to capture the peak action. Just a note on shooting bursts I suggest shooting quick bursts of about 1 second at a time.

The third thing with cameras is the shutter speed. There are typically two top shutter speeds one is 1/4000 and the second is 1/8000. For sports I would go for a top shutter of 1/8000. This is because there is a lot of times during day sports there is a need to shoot over 1/4000 especially if you're shooting at a wider aperture (ie f/2.8). 

The fourth thing is ISO capability. While for a lot of college and pro sports you can easily use lower ISO (and still keep a high shutter). Where the problem comes in is with high school. A lot of high schools have terrible lighting that requires higher ISO to maintain high shutter speeds. For cameras today and for the majority of stadiums 12800 should give you a high enough ISO.

LENSES

Moving onto lenses there are two things that I recommend. The first is a good AF system. The majority of new lenses have good AF systems but there are still older lenses that hold up very well with focus speed and accuracy. 

The second thing with lenses is a fixed aperture. A fixed aperture with a zoom lens will allow you to maintain a constant aperture throughout the zoom range. If you use a variable aperture longer lens you will end up with a high aperture zoomed all the way in which can cause you to have to drop your shutter speed or boost your ISO to unacceptable levels.

GENERAL

As far as general equipment goes If you're shooting sports I would suggest two bodies. One body with a medium zoom (ie 70-200) and one with a longer lens (ie 300+). What two bodies will do is allow you to quickly switch lenses if the play comes towards you. You typically don’t have time to changes lenses during plays. Now with that being said you can use one body and thats perfectly fine. You just have to be more aware and be prepared to move more. 

A few other general pieces of equipment you should look into are:
-Sturdy, high quality monopod
-Extra Batteries
-Extra Cards
-Strap (personally I prefer Black Rapid)

STARTER GEAR

Now you don’t have to spend a ton of money to get good equipment for sports photography. The first suggestion I have is the Nikon 80-200 f2.8 AF and the second is the 300 f4 AF ED-IF. Both are great options and can be found used for reasonable prices. You can find both most of the time on www.keh.com. Another good place to buy used gear is eBay however you have to be aware of who you're buying from on eBay. There are a lot of large stores (B&H, Adorama, KEH, Service Photo) have eBay stores.

You can check out my review of the 300 f4 HERE.

Stay tuned for further posts on sports photography. If you have any questions feel free to contact me.

Norfolk Skyline

Went out last night and did a few skyline shots of downtown Norfolk. Did a 16 shot panorama at 200mm which gives you really good detail of the downtown area. Might go out again and do another one at 400mm on another night. Check out the photos below.

Brooks Institute to Close

After 70 years of photography education Brooks Institute will be closing its doors. Personally Im a self-taught photographer. I've never attended a single class about photography and learned everything I know through trial and error, studying the work of photographers I look up to, and yes even watching YouTube videos. Even with all that I still recognize that Brooks was one of the premier school to learn photography.

This is also leaves major questions, concerns, and a lot of financial issues for current students. While Brooks was one of the premier schools to learn photography from, it was not regionally accredited leaving its students most likely with limited option to transfer credits earned at the Brooks Institute. To many students this will most likely lead to both years of their lives and thousands of dollars wasted because they will have to start over at another school. 

Here's hoping that an agreement can be worked out to allow everyone currently attending Brooks to continue their education at a different school.

Here's the press release from Brooks' website:

Ventura, CA – Monday, August 15, 2016 – With deep regret, Brooks Institute today announced that after 70 years of training media and visual arts students, it will close its doors on October 31, 2016. Students, faculty, and staff were informed of the closing at a meeting with school representatives on the morning of August 12, 2016.
“Although we had hoped that we could reinvigorate Brooks Institute, recent changes in economic and regulatory conditions have had a significant, prolonged negative impact on the institution,” said Kristen Howard, Brooks Institute, Transition Officer. “Our tireless attempts to mitigate this impact through contraction, strategic planning and innovation were sadly unsuccessful.”
Brooks will cease enrolling new students immediately and will not resume teaching classes this fall. However, Brooks will continue to offer administrative and student services support through October 31.
About Brooks Institute
Founded 70 years ago, Brooks Institute educates students in the visual and media arts. Based in Ventura, California, Brooks offers bachelor’s degrees in fields including professional photography, graphic design, film and visual journalism. In addition, the institute offers a master of science in scientific and technological imaging and a master of fine arts in photography.
Green Planet, the parent company of Brooks Institute, purchased the company in June 2015.
For more information, contact: Kristen Howard, transition@brooks.edu, 805-585-8010.
Press and Media Inquiries, please email MediaRequests@Brooks.edu

New ThinkTank Photo Shape Shifter Backpacks Released

Think Tank Photo Upgrades Award-Winning Shape Shifter®

Expandable Backpack and Adds “Naked” Option

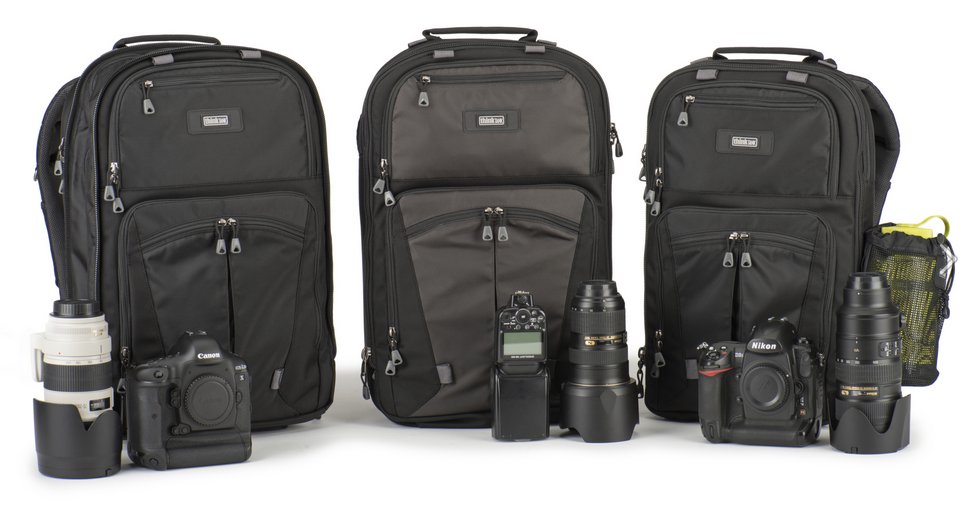
Santa Rosa, Calif. – A revolution in backpack design when it first released, Think Tank’s Shape Shifter expanded and contracted to hold gripped camera bodies and a laptop. In response to input from professional photographers, Think Tank has released the Shape Shifter in three new configurations.  The Shape Shifter 15 V2.0 is designed to hold a 15” laptop and the Shape Shifter 17 is designed to hold a 17” laptop.  The Naked Shape Shifter allows photographers to attach Skin Pouches or Lens Changers inside to create a totally customized modular backpack.

            “While traveling or on location, the Shape Shifter V2.0 lets photographers adjust their backpack to fit their workflow,” said Doug Murdoch, Think Tank’s CEO and lead designer.  “The Shape Shifters compress to three inches in depth when gear is removed, allowing photographers to have their gear at the ready while maintaining a slimmer profile when maneuvering through crowds.”

Key Features

Shape Shifter 15 & 17 V2.0

·       A great travel bag with extra space to fit a jacket, food, or additional gear

·       Tripod attachment on front of bag keeps tripod weight centered and allows access to gear without detaching the tripod

·       Easily accessible, plush pocket fits smartphones with displays up to 5.5”

·       Roller handle pass-through sleeve to attach to rolling luggage

·       Detachable water bottle pouch

·       Pro Speed Belt or Thin Skin Belt (sold separately) can be attached

·       Contoured shoulder harness with air channel for all body types

·       YKK® RC-Fuse zippers with lockable sliders (lock not included)

·       Upper front pocket with organizer for accessories

·       Lower front pocket with zippered pocket for accessories

·       Removable waist belt

·       Shoulder harness pockets, D-Rings, and sternum strap

·       Seam-sealed rain cover included

 Gear Capacity

Shape Shifter® 15 V2.0 Gear Capacity

·       Holds a 15” laptop, tablet up to a 12” or 13”, plus one DSLR (gripped or un-gripped) and three lenses (detached) and personal items

 Shape Shifter® 17 V2.0 Gear Capacity

·       Holds a 17” laptop, tablet up to a 12” or 13”, plus one to two DSLRs (gripped or un-gripped) and three to four lenses (detached) and personal items

 Naked Shape Shifter 17 V2.0 Gear Capacity

·       Holds a 17” laptop, tablet up to a 12” or 13”, plus four to seven modular pouches or lens changers and personal items

 Materials

Exterior: For superior water-resistance, all exterior fabric has a durable water-repellant (DWR) coating, plus the underside of the fabric has a polyurethane coating. The bag also has 600D twill, YKK® RC zippers, 320g dry-flow airmesh, nylon webbing, 3-ply bonded nylon thread.


Interior: Removable closed-cell foam dividers, polyurethane backed liner and dividers, 200D polyester, laminated non-woven backed nylex liner, 2x polyurethane coated nylon 190T seam-sealed taffeta rain cover, 3-ply bonded nylon thread.

 Specifications

Shape Shifter 15 V2.0

·       Exterior Dimensions When Expanded: 18.9” H x 12” W x 7” D” (48 x 30.5 x 18 cm)

·       Exterior Dimensions When Compressed: 18.9” H x 12” W x 3” D (48 x 30.5 x 8 cm)

·       Laptop Compartment Dimensions: 16.8” H x 11.4” W x 1.5” D (42.7 x 29 x 4 cm)

·       Tablet Compartment: 9.4” W x 12.2” H x 0.6” D (24 x 31 x 1.5 cm)

·       Smart Phone/Glasses Pocket: 6.7” W x 4.5” H x 1.6” D (17 x 11.5 x 2 cm)

·       Weight (with all accessories): 4.3 lbs. (2 kg)

Shape Shifter 17 V2.0

·       Exterior Dimensions When Expanded: 20” H x 12.5” W x 7” D” (51 x 32 x 18 cm)

·       Exterior Dimensions When Compressed: 20” H x 12.5 W” x 3” D (51 x 32 x 8 cm)

·       Laptop Compartment Dimensions: 19” H x 12” W x 1.5” D (48 x 30.5 x 4 cm)

·       Tablet Compartment: 10.2” W x 12.2” H x 0.6” D (26 x 31 x 1.5 cm)

·       Smart Phone/Glasses Pocket: 7.1” W x 4.7” H x 1.6” D (18 x 12 x 2 cm)

·       Weight (with all accessories): 4.6 lbs. (2.1kg)

 Naked Shape Shifter 17 V2.0

·       Exterior Dimensions When Expanded: 20” H x 12.5” W x 7” D” (51 x 32 x 18 cm)

·       Exterior Dimensions When Compressed: 20” H x 12.5 W” x 3” D (51 x 32 x 8 cm)

·       Laptop Compartment Dimensions: 19” H x 12” W x 1.5” D (48 x 30.5 x 4 cm)

·       Tablet Compartment: 10.2” W x 12.2” H x 0.6” D (26 x 31 x 1.5 cm)

·       Smart Phone/Glasses Pocket: 7.1” W x 4.7” H x 1.6” D (18 x 12 x 2 cm)

·       Weight (with all accessories): 3.8 lbs. (1.7 kg)

Check out ThinkTank Photo Gear by clicking on the photo below

Learn Your Equipment

I see a lot of comments for people looking to upgrade their cameras and when asked why they reply I can't get good photos and I think a [Insert new body] will help me take better photos.

A brand new camera is not going to make you a better photographer. A lens with a four figure price tag is not going to make you a better photographer. Top of the line studio strobes are not going to make you a better photographer.

These are just tools. Can they help get better photos? Of course, but if you don't know the capabilities or how to use them it wont matter.

Going out and shooting, pushing the limits, trying new ideas, failing miserably, figuring out what you did wrong, going out and trying again. Reading the owners manual and learning your camera inside and out, what ALL the functions are and what they do. Figuring out how changing one setting will affect other settings and how it will affect the over all photo. Taking chances and accepting both success and failure but learning from those failures and how to fix them so you don't fail the next time. This is what will make you a better photographer and in turn take better photos.

If you're considering buying a new camera stop and ask yourself have I constantly pushed this camera past its limits? Do I even know what the absolute limits of my camera are? If the answer to either one is no then go out and keep shooting and be happy with the camera that you have.

Photo for attention
D80 w/ 17-35 f2.8 @ 1/200, f/4, ISO 400

Beach Shoots

Did a couple beach shoots over the last few weeks and wanted to share a couple of the photos. Shot these with the D500 and 28-70 f2.8 VRII. Over all Im pretty happy with results but to be honest I need to work on my location lighting since I haven't done much in a while.

D500 Low Light Sports

Got to photograph the high school Atlantic Conference Championship and this was the first time I used the D500 in low light. I was still getting used to the camera and the super fast auto focus system so I had a lot of problems getting good photos. The game started at about 8:30 at night and the lighting on the field wasn't the greatest so I knew I would have to try out the D500's high ISO performance.

Overall I was pretty happy with the ISO performance of the camera just not with my performance handling the camera. Here's a few of the photos I got at 16000 ISO.

Long Exposure Sunset

Went up to First Landing the other night to shoot the sunset. I wanted to get a photo with the sunset (obviously) but wanted to try some long exposure to get movement in the water. Ended up doing a stacked photo to get a hint light back in the rocks while not blowing out the sky. 

Outdoor Portraits

Did a shoot at the local state park about two weeks ago and wanted to share some of the photos. Shot these with the D500 and 70-200 f2.8 and it proved that once again that is probably my favorite combo for camera and lenses.

It was a challenge during this shoot to keep the background from blowing out (we were shooting around noon) while keeping good exposure on the face.

July 4th Fireworks

Went out last night and photographed the fireworks by my house. Ended up losing a bunch of good shots because there wasn't much wind and the smoke wasn't dissipating very fast and stayed pretty heavy in the photos. Pretty short post but here are some of the photos.